Friday 29 June 2018

Take It Make It Challenge: June Winners

Hello everyone!
We are so pleased to announce the winners of our June Challenge!

As you all know, we have two winners to announce today, so without further ado, let me introduce you to the Design Winner.....

Entry Number 17: Ksenija
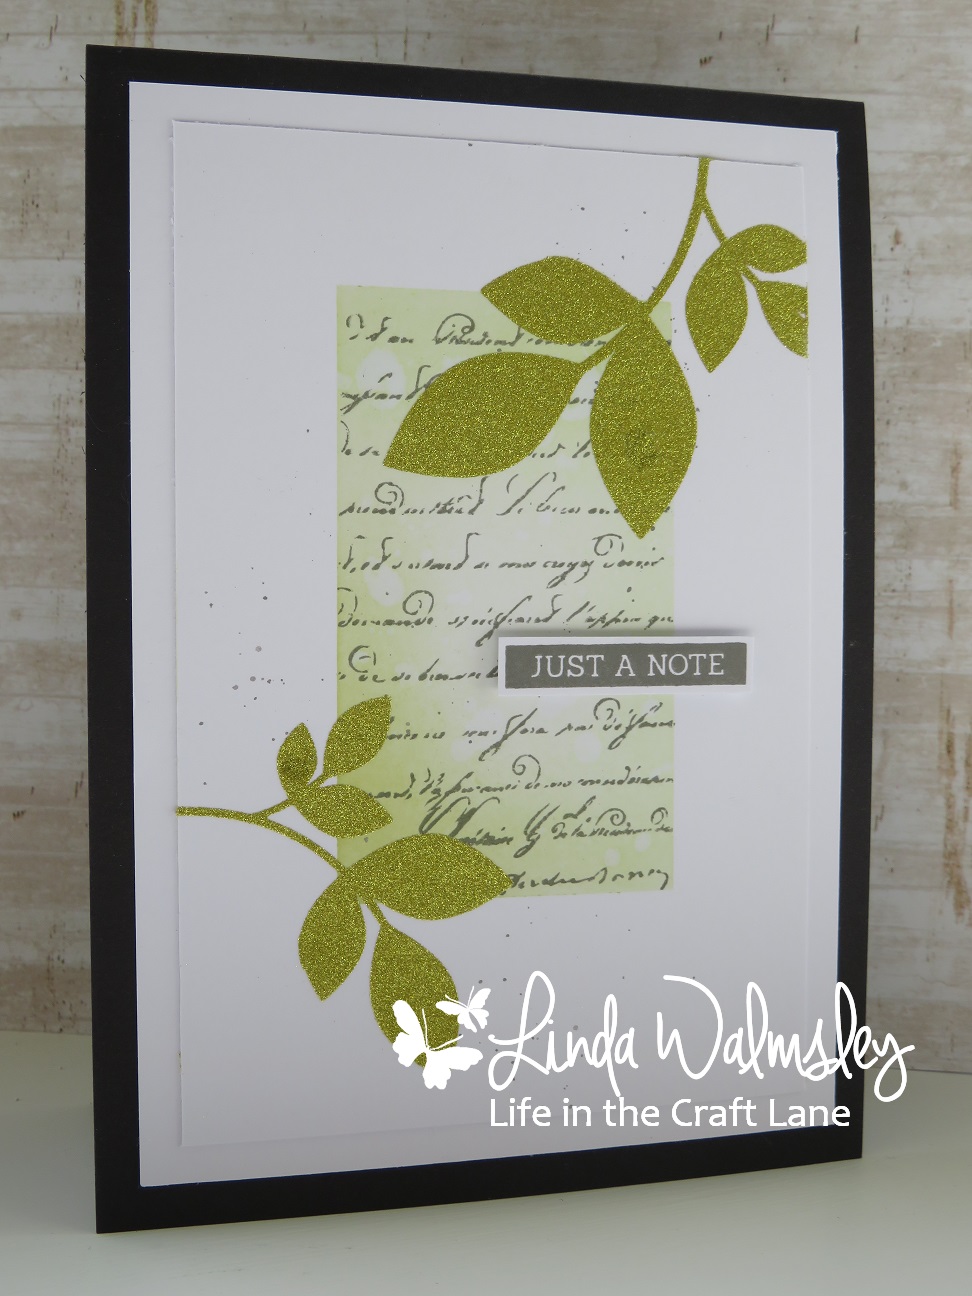


We loved this beautiful project by Ksenija! The stunning flower sits pefectly alongside the embossed die cut greeting. So elegant! Ksenija will win a Guest Designer slot here on the blog, her very own Winners Profile, and of course her amazing art will be featured in it's own 2 page spread in Craft Stamper magazine! Congrats!

We also have the remaining top slots to announce!

The remaining Top Five (we had a few ties in the voting this month!) are:

Entry Number 47: Emma
 Entry Number 49: Amanda
Entry Number 22: Bonnie 
Entry number 91: Sharon


Wonderful projects ladies!

We now need to share the randomly chosen winner with you all!
This winner will receive the prize offered by our sponsor this month:


Uniko


Uniko is a one stop shop for amazing clear stamps! Wonderful designs, made from a superb quality photpolymer.  The owner and designer, Beverley Brown, is an avid paper crafter and has been a stamp addict for many years. After completing a BA (Hons) in Textiles & Surface Design she decided back in February 2012 to combine her passions and launch her own range of stamps, designer dies & digital paper collections. The result is a shop full of stunning designs! Be sure to check them out!
The prize on offer for the randomly chosen winner this month is this set of three stamps and a fabulous stencil!:


Congratulations to our winner:


Entry Number 90: Gerrina


      Congrats! I think you'll have a wonderful time  playing with your new goodies!

Winners, you need to need to get in touch with me in order to claim your prize!  Please email me at: editor.cs@mytimemedia.com , and put TIMI Winner in the subject line, then I'll be sure to spot it! 
Top Five Design Winners, also please contact me if you wish to receive a button to display on your blog.


Our July challenge will be launched next Friday, July 6th
We can't wait to see all the wonderful art you will all be sharing!

Friday 22 June 2018

Blog Exclusive: Charlotte Kristensen

Good Morning!
We have a special treat for you today, a wonderful tutorial from the talented Charlotte Kristensen!
I know all of us at Craft Stamper HQ have a deep fondness for washi tape, and I have a feeling lots of you do too :)
Charloote is very kindly sharing a great technique for creating your own bespoke tape, such a wonderful idea!
Over to Charlotte.........

You might very well have  a roll of masking tape lying about, so try this fun project to make your own
washi tape - you can co-ordinate colours and themes to go exactly with the project you're doing!

Step 1: Cut lengths of masking tape and stick down onto a piece of acetate or non stick paper
(I used the backing sheet from some EZ mount).


Step 2: On a craft sheet, put down the Oxide Distress Inks and mist very lightly - you don't want to
get the masking tape too wet! I used antique linen, peeled paint, faded jeans, frayed burlap and
peacock feathers. Dry between each colour application. You can obviously also just dry sponge inks
onto tape, blending the colours well as you go along.


Step 3: I found the result a little bit too pale, so added some Distress Spray - stormy sky, as well as
mermaid lagoon (not shown - bottle was camera shy!) Leave to dry completely.


Step 4: Once dry, I stamped images all over using Archival Ink Pad Potting Soil.


Step 5: Then a smaller amount of images using Archival Ink Pad Sienna.


Step 6: Next, images in Versafine Blue Lagoon. Now all the background is done.


Step 7: The foreground images are stamped in Versafine Black Onyx. I used a mixture of words and
images.


Step 8: Finally, a bit of doodling using a white gel ink pen.


Step 9: Close up of finished project.


Masking tape is not archival quality, so be careful not to use it with anything that is supposed to last a
very long time!

I used a mix of stamps - this is a great opportunity to use everything you've got, as the background
stamping is simply to provide texture and pattern. Amongst the stamps used are Impression
Obsesssion Seth Apter, Carabelle, PaperArtsy, Viva Las Vegas and AAL & Create.

Thanks so much Charlotte, such a fab tutorial!
Why not check out more of Charlotte's work on her blog:
http://aliceoverground.blogspot.com/


Friday 15 June 2018

Take It Make It Challenge: Winners Profile!

Hello!

Welcome to our Winners Profile, showcasing the Design Winner of our last Blog Challenge!

The very talented Design Winner of our May 2018 challenge is

Jenny Martin

 From: 


Jenny won the challenge with this fabulous card!We loved the fabulous alcohol inked background, simply perfect as an ocean for the cute whale!


We asked Jenny a few questions all about stamping (well, we are Craft Stamper after all!)


Q: Do you think your stamping/mixed media style has changed since you began stamping? And if so, how?
A: Yes, thank goodness! My earlier cards had a lot more layers and usually incorporated patterned paper, ribbons and an embellishment or 2! Now I make more CAS cards and usually concentrate on a technique or media.


Q: Do you have a ‘go to’ technique that you love to use?

A: I go through phases, for instance I was addicted to Alcohol Inks for a few weeks, until my asthma flared up. Before that I was using Copics on most of my cards for a month or so and now Im back to watercolour, which is my favourite.


Q: Do you have a favourite colour combo?

A:Definitely blues and greens. That too has changed, because I used to use a lot of red, pinks and purples.


Q: Inks or paints? Or both?!

A:Both. I often use Zig Markers for watercolour as its so easy , but I love practising with real watercolour paints, such as Daniel Smiths. I recently did an online mixed media class and that was using Acrylic and Indian Inks and I found that lots of fun.


Q: Can you remember the first stamp you ever bought…. And do you still use it?

A:I have kept  my favourite wood block stamps and display them in a vintage glass fronted cabinet in my craft space.  I occasionally use them! I think my first was a butterfly from PSX.


We also asked Jenny to show us  favourite stamped creations,  and share why she likes them so much. Here are the gorgeous projects she has chosen:


"This is using one of my favourite Penny Black Stamps. I love making watercolour cards with their brushstroke stamps" - Jenny


"This was my first mixed media project on Ampersand Aquaboard as part of the online class. I was happy because I used colours that I normally would never put together, so I felt I learnt from this exercise" -Jenny

"This is one of my favourite Alcohol Ink cards" - Jenny


Congratulations on being our May Design Winner Jenny, and it was lovely to learn a little more about you!


Do YOU fancy having a winners profile all about you on the CS blog? 

The profile is part of the prize package for each Design Winner of our challenges. All you need to do is enter a creation into the challenge, then if you are voted Design Winner everyone will be reading all about you before you know it!

Wednesday 13 June 2018

Art Call; Ready Set Stamp

Ready Set Stamp: Reader Submissions Wanted!

THANK YOU so much for all the fabulous cards submitted for our last art call, it was so hard to choose just a few to publish! We can now announce the next theme.....
We are looking for submissions for our Ready, Set, Stamp feature on the following theme for our October 2018 issue of Craft Stamper. If you've always wanted to see YOUR card in print, now is your chance!


Colours: Sage Green, Pale Leaf Green, Bark, Rich Burgundy

Deadline for submission: 17th July 2018


· Please email your submissions to: editor.cs@mytimemedia.com
· Please put 'Ready Set Stamp' followed by the theme in the subject line
· Please note that due to the number of submissions it's not possible to contact every entrant individually - if you have not heard from us within one week, your submission has not been successful. Please try again with a different card!


Guidelines:

  •  Please make cards only for this gallery.
  • Please follow both the theme AND the colour scheme when creating your cards!
  • NEW work only please, we do not accept cards that have been published elsewhere (including online) before submission.  
  •  Stamps used MUST be available to buy currently, either from a UK stockist or a stockist with an international shipping policy that ships to the UK.
  • We do not accept cards ONLY created with digital imagery for this feature. Digital imagery is welcome, but  MUST be used in conjunction with rubber/polymer stamping to qualify.
  •  Cards which are selected need to be posted to the Craft Stamper offices in the UK. The cards will be returned, along with a complimentary issue of the magazine.
  • This call IS open internationally.
  • Note that we do choose artwork as it arrives, so please don't wait until the last minute to submit if your cards are ready.
  •  Black, white and metallics can be added to any of the schemes. The ideas given are simply that, ideas, and do not have to be followed to the letter!
  • Text for this article is required (don't worry - it is short!) and should be entered into the document provided – this will be sent to you if you are selected.
  •  
We can't wait to see your fabulous creations!  

Friday 8 June 2018

Take It Make It June challenge: Inspiration

Hello!
Our June challenge is well under way, we love all the entries we've seen so far, and can't wait to see more!
As it's the second Friday of the month, we're back with some more amazing eye candy from our DT, hopefully something will inspire you to enter the challenge!

So... just a little reminder before we show you the projects!

 ALL of our challenges this year are 'Anything Goes' stamping challenges!
So....Show us how unique you can be, create anything your imagination cares to dream up! Share your cards, journal pages, layouts, 3D assemblage or whatever else takes your fancy. As long as you have stamped somewhere on your project, then you're good to go!

We have two prizes on offer, as always. The first is the Sponsor Prize, and the winner of this will be randomly chosen from all the eligible entries of the challenge. To make sure your project is eligible to win, make sure you have followed our challenge guidelines. These can be found on our sidebar over here ---------->

and also in a tab under the banner at the top.


PLEASE REMEMBER: We only want to see ONE project in each individual blog post entry!


A set counts as more than one :)

Uniko


Uniko is a one stop shop for amazing clear stamps! Wonderful designs, made from a superb quality photpolymer.  The owner and designer, Beverley Brown, is an avid paper crafter and has been a stamp addict for many years. After completing a BA (Hons) in Textiles & Surface Design she decided back in February 2012 to combine her passions and launch her own range of stamps, designer dies & digital paper collections. The result is a shop full of stunning designs! Be sure to check them out!
The prize on offer for the randomly chosen winner this month is this set of three stamps and a fabulous stencil!:


We hope the prizes on offer have inspired you to take part... and here are some fabulous projects by our Inspiration DT to give you even MORE inspiration!


Cheetarah Cheda


Suz Humphreys


Wow!


Amazing inspiration from the DT!
The link up tool to enter the challenge can be found on last Fridays post HERE!

Saturday 2 June 2018

Blog Exclusive: Jo Firth Young

We hope you are all having a fabulous weekend!
 In the latest issue of Craft Stamper magazine, Jo Firth Young shares a fabulous project featuring a truly 'Gorjuss' Ruby!
Jo also created the stunning tag that complements the main project, and today we're sharing the full step by step tutorial!


Swinging into Summer
By Jo Firth-Young

Happy Tag

MATERIALS LIST

Stamps Jo used...
Santoro Gorjuss: Ruby gor907251
PaperArtsy: JOFY61; JOFY59; JM62; JM58

Other materials...
PaperArtsy stencil: PS081
Faber Castell Polychromos colouring pencils
Greyboard
PaperArtsy Fresco Finish Paint: Granny Smith; Blue Oyster; Magic Moss; Mud Splat; French Roast
Ranger Archival ink: Black; Leaf Green
Prima Julie Nutting Tag
Wplus9 die: Happy
Ribbons


INSTRUCTIONS:


1 Apply a wash of Blue Oyster paint around the edges of the tag, leaving the centre clear. Add Bundled Sage
Distress Oxide to the bottom edge.


2 Stencil leaves in Granny Smith, hanging from top edge of tag, repeat if necessary to fill the space.


3 Paint an 8cm x 3cm piece of Heavy Smoothy card in Blue Oyster. Die cut ‘happy’ from white card and attach
to the blue panel.


4 Stamp, colour and cut out leaves and flowers, ready to assemble on tag.


5 Stamp Ruby and colour as required. Cut out, then cutting her in half at chest height.


6 Assemble all pieces as shown in photo. Create dimension by using different amounts of adhesive, for
example, 3D foam and glue.


We love the tag, thanks Jo for sharing the tutorial!
Don't forget, if you hop on over to the Craft Stamper website, there is a chance to win one of the Gorjuss Ruby stamps (along with many more giveaways!)