Our project today is a stunning example of just how effective a monochrome scheme can be... Lydia Brooke Evans showcasing a gorgeous white on Kraft card. This was first published in our January 2015 issue.
Lydia says:
“Kraft and white is such a classic and timeless look. Add to this some white heat-embossed vellum and you have a look that just screams luxury that will work for any occasion and either gender.
Whether it’s for adding layers or simply somewhere to add a sentiment, vellum has returned with a vengeance and I don't think it will be going anywhere soon.
It can be used on all manner of papercrafts and works well for all occasions and genders, it's just so usable. Although there is a caution when working with vellum; you can see adhesive through it. There are adhesives available that say they can be used on vellum that will be invisible once applied, but I just find it simpler to use the adhesive where I will be adding something on top to hide it.
I love the look of tone-on-tone especially white-on-white, and this look is greatly enhanced with white heat-embossing on vellum. Just adding in some natural kraft card gives such an elegant and classy look that could be used for all manner of cards.
I love to mix and match sentiments by using different fonts or ink colours, and using stamped and die-cut sentiments together is a fun twist on this. Adding Enamel Accents to the die-cut words is a great way to add extra interest and dimension to them but they do take a while to dry so maybe if creating these cards in a hurry you could skip this step to finish your card quickly"
Materials
Stamps Lydia used...
Paper Smooches: Blossoming Buds
Other materials...
Paper Smooches: Kudos Word Dies
Lawn Fawn: Stitched Scallop Borders
Tsukineko: VersaMark Ink
Crafter’s Companion: Neenah Solar White Card; Neenah Desert Storm
Ranger: White Enamel Accents
Vellum
Anti-static bag
WOW! Bright White Embossing Powder
Heat gun
Washi tape
Step-by-step... Stamping on Vellum
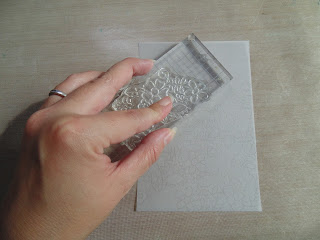
1 Cut a piece of vellum to size, dust with an anti-static bag and then stamp a repeating pattern with the large floral cluster from the stamp set with VersaMark ink.
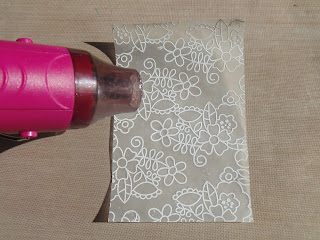
2 Add white embossing powder over the stamped images, knock off the powder that has not adhered and then heat with a heat tool.
3 Cut the 'beautiful' word die out of white cardstock. Trace over the word using white Enamel Accents and then leave to dry.
4 Using the middle sized scalloped border die cut one length of the piece of kraft card that will be the sentiment strip.
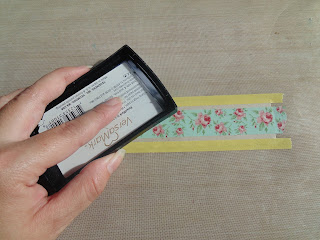
5 Using strips of washi tape mask off the edges and centre of the kraft card to leave two thin exposed areas.
6 Add VersaMark to the exposed strips, then add white embossing powder to the ink and heat set. Then remove the washi tape.
7 Take a piece of white card slightly wider than the kraft, cut one edge with the same border die and add the piece of kraft card on top.
8 Once dry add the die cut sentiment to the strip and stamp and heat emboss the 'You're' above it on the sentiment strip.
9 To assemble the card, first add the vellum to the kraft card, then the sentiment strip with foam pads. Snip of the over hanging edges of the strip and then add the piece to the base card.
That bright pop of white is just stunning...
Thanks Lydia!
We'll have the start of our Christmas Throwback Thursday posts starting next week, don't forget to check back!


nice !
ReplyDeleteKraft and white! Love the use of border dues for the sentiment
ReplyDeleteThank you for sharing
X
Kraft and white! Love the use of border dues for the sentiment
ReplyDeleteThank you for sharing
X
nice article great post comment information thanks for sharing
ReplyDeletegclub
goldenslot
gclub casino