Tuesday 29 July 2014

New issue out this Friday!

Hey there, stampers! September's issue of your favourite magazine hits the shops this Friday, 1st August, and as usual we have a dazzling array of different projects to inspire you.


Check out our cover girl, Georgina Ford's delightful Distress Marker Diffuser creations - so elegant! This month's Free Cover Stamp is designed by our very talented DT member Teresa Abajo, who urges us to "Seek Happiness". A sentiment I think everyone can relate to. Plus:
  • Transport yourself to the tropics with Part 3 of our fabulous Scenic Stamping series
  • Get in touch with your feminine side in this month's Ready, Set, Stamp! as we celebrate Ladies' Night
  • Create gorgeously tactile texture with a clever adhesive sheet embossing tutorial
  • Blend like a pro with an ingenious die cut and Pan Pastels technique
  • Put empty boxes to good use with this month's amazing Masterclass on Corrugated Cardboard!
Until next month, enjoy!


Monday 28 July 2014

Insider Secrets: Chris Dark

Design Team member Chris Dark reviews her favourite stamping product and tells us what she loves most about embossing ink and some exciting ways of using it!


Heat Embossing with embossing ink was one of the first techniques I came across when I started paper crafting, there’s something about watching embossing powder melt on top of an image stamped with embossing ink that’s magical. The formulation of embossing ink is designed to make it sticky and slow drying in order to catch and hold onto embossing powder prior to heating but there are lots of ways of using embossing ink that make it a foundation item for an ink collection.

Have you tried stamping with embossing ink and then dusting over mica powder, chalks or pastels? These products are great for using over both light and dark card and give a lovely rich look to projects. Self colour stamping with embossing ink for subtle interest is great for backgrounds (I’ve found that repeat patterns work well) and on a mid to dark tone of card you get an elegant finish. 

Add an embossing folder and brayer into the mix and there’s another interesting way to put pattern onto card with embossing ink. Use the inked brayer to transfer the embossing ink onto the flat side of an embossing folder and then add coloured ink, mica powder or pastel to highlight the pattern. Embossing ink also works brilliantly as a resist, as well as being an aide for stamping with rubber stamps into hot melted ultra thick embossing powder. The embossing ink acts as a release agent for the stamp once the ultra thick has cooled allowing the stamp to be easily removed.


For my card I initially created a pattern using IndioBlu stamps on black card using the embossing ink to stamp. When the stamping was complete I brushed on Ranger Perfect Pearls powders in cream, gold and blue and dusted off the excess with a tissue to leave a lovely shimmery floral pattern of flowers and leaves on my card. I repeated the process onto a white card blank this time only using the gold powder. Then I assembled the card and embellished with gold cord, dots and lines of relief paste to the centres of the flowers and edges of the leaves. I only used half of the patterned black card that I created so I had some leftover to make a tag.


Above I’ve shown how the stamping looks after applying the mica powder and before cutting my piece for the card. I love the rich effect achieved with this technique which is an old one, but one that gives very pleasing results.

Thanks for looking in at the Craft Stamper blog and have creative day.

To see more of Chris’ work visit www.sketchingstamper.blogspot.co.uk

Friday 25 July 2014

Take It Make It Challenge July: The Winner!

Hello everyone!
Thank you so much to all those who played along with our July challenge - Embossing Powder Resist! The DT were thrilled at the number of entries, and had a fabulous time looking at all of your stunning work.Who knew such a classic technique could produce such wonderful projects?
The DT were blown away by the standard of the entries, but there can only be one winner! That honour goes to.........
Entry Number 36: Marjan
 Congratulations Marjan!
We loved the vibrant colours, and how the watercolours have been used to such great effect!
The winning entry will be published in Craft Stamper Magazine (I hope you kept it somewhere safe Marjan!), and the winner will also receive the fabulous prize from our sponsor
www.wowembossingpowder.co.uk

 WOW Embossing Powders:

 As well as our worthy winner, we also have the remaining two spots in our Top Three to reveal! In no particular order, they are..... drum roll......
Congratulations ladies!
If the Winner could Email me (just click the 'posted by' name at the bottom of the post), then I can pass on all the details about the prize, publication and of course the Guest DT slot! Top Three, please Email me for your winners buttons to display on your blogs!  For anyone else who would like to, please feel free to grab the button below....
 A huge THANK YOU to all those of you that took part in the Embossing Resist challenge!
Don't forget, Take It, Make It challenges are now monthly! The first Friday of every month will see the start of the next challenge.... so check back here next Friday, 1st August to see which technique is next!

Tuesday 22 July 2014

Meet the team - Joanne Allison

We've had a little break but we're back with the next in our regular series introducing some of the designers who contribute regularly  to Craft Stamper - welcome! Today, I have the slightly surreal task of interviewing... myself!

I’m Joanne and I'm camera-shy so this is one of the few photos of me in existence! I've been contributing to Craft Stamper for about three years now and really enjoy the variety in the magazine - I learn lots and enjoy the different styles my fellow designers have to offer. 

Crafting has been part of my life for as long as I can remember; both my parents are creative and their encouraging attitude when I was little probably contributed a lot to my tendency to just have a go and see what happens when faced with new tools and products. If something went wrong, my mum always said "Can you make a feature of it?" which had the effect of turning mistakes into creative opportunities!

Favourite project #1: I think of myself as a stamper rather than necessarily as a papercrafter, partly because I love to use my stamps to make things other than cards. This pendant was made for a Craft Stamper blog hop to kick off 2013 and is based on an article I wrote for the December 2012 issue. It's a chipboard base with UTEE and Perfect Pearls and I still wear it!

{this project is blogged here}

Q: Do you have a signature style or favourite technique?


A: I always find this hard to answer  because I don't think I have a particular style and yet other people tell me they recognise my makes. My mum looks through the pages of Craft Stamper and almost always says "That's Joanne's project" before she's looked at the designer's name! I do like colouring and I tend to err towards fairly classic images but I'm what I believe is known as an "equal opportunities" stamper - I like a bit of everything!

Favourite project #2: I have very little drawing talent and find one of the  beauties of stamping is that you can get around that limitation! These pretty vintage roses look lovely stamped and coloured in the usual way but here I decided to try out some "borderless" colouring for a slightly more arty look that's soft and feminine.

{this project is blogged here}

Q: Where do you look for inspiration before you start on a project?

A: I usually start with a particular stamp I want to use or perhaps a combination of colours I find particularly appealing. For cards I find especially difficult (usually kids' birthday cards!) I usually turn to a challenge or two for a kickstart. I often find I'm more creative if I have limitations in place and for me a challenge can often play that "limiting" role as it provides a focus.

Favourite project #3:  I don't often do "grungy" but this was great fun with the combination of the delicate feather images, a home-made stencil and some inky spray and modelling paste - a slightly prettier form of grunge, I guess. It made a change not to be colouring in as well!

{this project is blogged here}

Thanks for joining me, if you'd like to see more detail on any of the featured projects, the links will take you straight there. If you'd like a general browse with a cuppa, you'll find my blog here (the cuppas are virtual I'm afraid unless you bring your own!).

Monday 21 July 2014

Introducing.... our new Design Team!

Hello!
A great big, tremendous, massive 
Thank You 
 to all those who applied to be a part of the Craft Stamper Blog Challenge Design Team!
It took a very long time to look at all your fabulous art, and to see all the wonderful things you create on your blogs....you are all a very talented bunch!
The task was really hard, but (in the words of Simon Cowell!).....we have come to a decision.

In no particular order, the new CS Take It, Make It design team, going forward from September will be......


Kymona Tracey: www.kreativekymona.com 


Zoey Scarpelli: www.scrapsaurus.blogspot.it 


Jolande van Oosterhout: www.justjolande.blogspot.nl 

Shirley Bampton: www.shirley-bee.co.uk 

Elina Stromberg: www.artsandcraftswithlove.com 


A huge CONGRATULATIONS to those current DT members who braved the application process for the second time and will be staying with us, 
and an even bigger WELCOME to those new to the Craft Stamper family!

I will be in touch in a couple of hours via email to let all successful applicants know where we go from here, so keep an eye on those inboxes!

Thank you to everyone who made it such a hard decision, we are constantly amazed at the sheer numbers of very talented stampers out there! We look forward to seeing more of your work in our future challenges!


Thursday 17 July 2014

Sew Sweeter...

Hi! It's Georgina Ford. My blog post today is a follow-on from my article, Sew Sweet, in the current (August) edition of Craft Stamper magazine. For both my cards in the magazine I have used sewing and thread to attach the beads. But if you aren't keen on sewing or want a quicker result then you can use glue to attach the beads.

I have made a card again using the beautiful Flower Frame 1 rubber stamp by Catherine Scanlon Designs. I have attached the beads with Cosmic Shimmer Acrylic Glue.


Additional materials I used:
Distress Marker: Walnut Stain
Foam pads
Cosmic Shimmer Acrylic Glue

Instructions:
Cut squares of brown card 10.5x10.5cm and white card 9.5x9.5cm and attached them to an 11.9x11.9cm card blank. Stamp the sentiment using Walnut Stain Distress ink pad. The sentiment stamp I used was from Grungy Greetings # 1 stamp set by The Artistic Stamper.

Next stamped out four leaves and the large flower four times using a Tuxedo Black Memento ink pad onto smooth white card. Colour the stamped images with Copics, then cut out all the pieces. Attach the leaves flat onto the card. Add the flower in sections with foam pads. As a base use a whole flower head. Then add petals and the centre separately as layers for extra dimension.

Attach the beads as shown below. Add the glue directly to the centre of the flower and then add the yellow seed beads. Add the glue to the bugle beads then add to the leaves. To finish draw the faux stitching around the edge as show in the main photos above.
 

Penny saver tip:
First look at what coloured beads you already have and then colour the flowers and leaves to match. 

Monday 14 July 2014

Stamping Contrasts - Guest Designer

In our August issue our designers had the chance to get creative with these lovely, versatile sentiment stamps from Visible Image. This stamp set is perfect to brighten up someone's day and the flower is separated into flower-head and stem to make it even more adaptable for your own designs.


We gave one lucky reader the chance to play along with this month's stamping contrasts and here are the results. We love the original way in which Hellen Pearce has used this set!

Materials…
STAMPS: Visible Image – Thinking of You set. INKS: Adirondack; VersaFine - Black. OTHER: Memory Box Dies – Butterfly Vine and Kensington Border; DecoArt Glamour Dust; cardstock – black, white, pale blue, silver.


Because Every Cloud Should Have a Silver Lining
I felt that the sentiment stamp needed an understated background to ensure it was the main focus. I played around with a few techniques but in the end chose this one made by marbling ink and water as it gives a ‘floaty’ feel which I feel suits the sentiment’s reference to ‘skies’. I continued with this theme using silver card to create a ‘silver lining’. I stamped onto the dried background using black ink and arranged the matted and layered pieces onto a card base. I also added some die cut butterflies because when I watch butterflies in the garden they make me smile, and I would use these stamps for a card to cheer somebody up.


Butterfly Love
My tag was made to compliment the card. I used the same techniques but with a few different butterflies and a sprinkle of glitter. All the butterflies used on both the card and tag came from border dies which I cut up – I always try to buy products that are versatile and good value for money!

Thank you Hellen for these beautiful makes – visit Hellen's blog to see more of her work. If you haven't seen the article in our August issue, then grab a copy and get even more fabulous inspiration from Kim Bacon, Chris Dark, Chrissie Stokes and Joanne Allison! Available to buy from WHSmith, many craft shops or with free P&P for a limited time from our shop! Also available as a digital download here.

Visible Image Thinking of You set costs £8.99. To purchase this or to see other stamps from Visible Image  visit www.visibleimage.co.uk.

DT Call: Last chance to apply!

Hello!
Just a quick reminder....
Today is the last chance to apply to be part of the Craft Stamper Family, the DT call closes in a matter of hours....
We are looking for a new DT for our Take It, Make It Blog challenge!
All details can be found HERE


Friday 11 July 2014

Take It Make It July Challenge: Inspiration!

Hello!
Our current Take It, Make It challenge is all about creating a resist using embossing powder.... have you got out the powders and had a go yet?
The DT have been having loads of fun creating some more projects for you to feast your eyes upon, hopefully they may inspire you to have a go yourself!

Winner of the May Challenge: Ruth Mescall
Dot Allan
 Elizabeth Robinson
 Linda Walmsley
 Nikki Killinger
  Renee Zarate
Riikka Kovasin
(Riikka has done a fab Youtube video on how to create her card, just click on her name to see it!)
 Wow! Now THAT'S what I call inspiration!
Why not have a go, then enter your creation into our challenge?
We have a great prize from our sponsor, WOW Embossing Powder, the chance to be published and a guest DT slot up for grabs....so why not get out that powder and start Embossing!!!
All the details can be found HERE....
Have fun!

**** FINAL REMINDER!!!****
Our DT call will close on Monday 14th..
Don't lose the chance to become part of the Craft Stamper family!
Full details HERE

Friday 4 July 2014

Take It Make It Challenge: July!

Hello!
I am very excited to announce.... *cue drum roll*..

The brand new July Challenge!

We loved all your bleached blocked entries last month, we were thrilled to see so many! We can't wait to see all the projects featuring this months theme!

What Can You Win?
For the July challenge, we are delighted to be sponsored by WOW Embossing Powder!
http://www.wowembossingpowder.co.uk/


WOW Embossing Powders are UK suppliers of a truly massive selection of embossing powders from fine detail through to ultra thick, from metallics to pearlescents and fluorescents! WOW also manufacture a fabulous selection of silicone moulds, perfect for creating 3D embellishments.
The prize for the July challenge is a set of the latest, brand new embossing glitters, a mouthwatering range of colours!
http://www.wowembossingpowder.co.uk/
You will receive (from left to right): Blue Topaz, Mint Mojito, Orange Fizz, Calypso, Raspberry Coulis and Frozen Berries.... Don't they sound delicious!

PLUS:The Design Team will have a look at all your gorgeous work, and choose their Top Three..... and the overall Winner will get published in Craft Stamper magazine! Yes, the winning entry will appear in the UK's number one stamping magazine!
AND: The Challenge winner will be offered a Guest Designer spot for an upcoming challenge!

So, to recap....Six gorgeous WOW Embossing Glitters, Publication AND a Guest DT spot? Sounds good to me!

Now for the Challenge details!  
We want to see how you lovely lot tackle a technique showcased in Craft Stamper magazine.
Anna-Karin Evaldsson has a wonderful project in the August issue, a fabulous card featuring (amongst other things!) an Embossing Resist technique.
 So, we would love to see your creations using 
 The Embossing Resist Technique!
Simply stamp an image and then emboss it. Apply ink over the top, and you will see the embossing will resist the ink.... the embossing resist technique: easy peasy!

Along with some of the regular Craft Stamper DT, the Take It , Make It DT have created some fabulous eye candy using the embossing resist technique.
If you click on the artists name, it will take you to their blogs, where there may well be loads more pics of these gorgeous creations!

From the August 2014 issue: Anna-Karin Evaldsson
Dot Allan

Elizabeth Robinson

Georgina Ford

Geraldine Carruthers
Kim Costello


Linda Walmsley

Nikki Killinger

Renee Zarate

Shirley Bampton

Tracy Easson

WOW... now THAT'S what I call Design Team inspiration!  

pssst...... have you heard? Craft Stamper are looking to recruit new DT members for the Take It, Make It blog challenge! The DT call closes on July 14th, and all the details can be found HERE! Go on... you know you want to!

 Have we inspired YOU to have a play and enter? Yay!!!
All you need to do now is have a read through the boring (but essential!) rules and guidelines, then upload your entry using the Linky tool at the end of the post! Can't wait to see what you create!

Do you love our challenges as much as we do? Feel free to grab the button and display it with pride!
 Guidelines for Craft Stamper Take It, Make It Challenge
  • Entry dates: Friday July 4th 2014 -  midnight Wednesday July 23rd 2014
  • Winner to be announced in a blog post here: 9am Friday July 25th 2014
  • All entries must feature the Embossing Powder Resist technique.
  • All entries must contain stamping.
  •  No digi stamps please, unless combined with actual stamping. 
  • Projects can be of any theme, any colour. 
  • Projects can be a card, layout, journal page, art panel, tag, 3D item, anything at all, as long as it follows all guidelines and features that months technique.
  • The winning entry MUST be posted to the magazine for photography before it can be published. Please keep hold of your entry, we cannot publish in the magazine images sent via computer.
  • Entry is via the linking tool at the end of the post. We are very sorry that we can't accept email entries to this challenge. Please provide deep links to your actual project post, not just a link to your blog (to do this, click on the title of the relevant blog entry and copy/paste the URL in the relevant box when uploading your entry). The DT will not go searching your entire blog for the project we want to see!
  • No backlinking.
  • New work only please, not work previously published anywhere else.
  • Entry is welcome from anywhere in the world.
  • Multiple entry is welcomed, as long as each project has a separate blog post, is original, and fulfills all the entry requirements. One project per post please!
  • Entries can be combined with other blog challenges.
  • An obvious link back to the Craft Stamper Blog must be included in your blog post.
  • The August 2014 challenge will be announced here on Friday August 1st 2014, at 9am.
PLEASE consider turning off word verification on your blog. It is very difficult for the DT to comment on as many blogs as we would like to when word verification slows us down!


Competition rules: Competitions/giveaways are open to all (including overseas readers) except employees of Traplet Publications Ltd and their families; regular contributors to any of Traplet Publications’ magazines; employees of our printers; or anyone connected with the prizes offered. By entering the competition you accept that your project may be printed in the magazine. All entries must be received by midnight on the specified closing date. There are no cash alternatives and prizes are non-transferable. We reserve the right to use the winners’ name/work in any Traplet-produced literature including, but not exclusive to, our website and marketing materials. Judges decision is final and no correspondence will be entered into.

Thursday 3 July 2014

Taking It A Little Further With Lydia

By Lydia Brooke Evans 

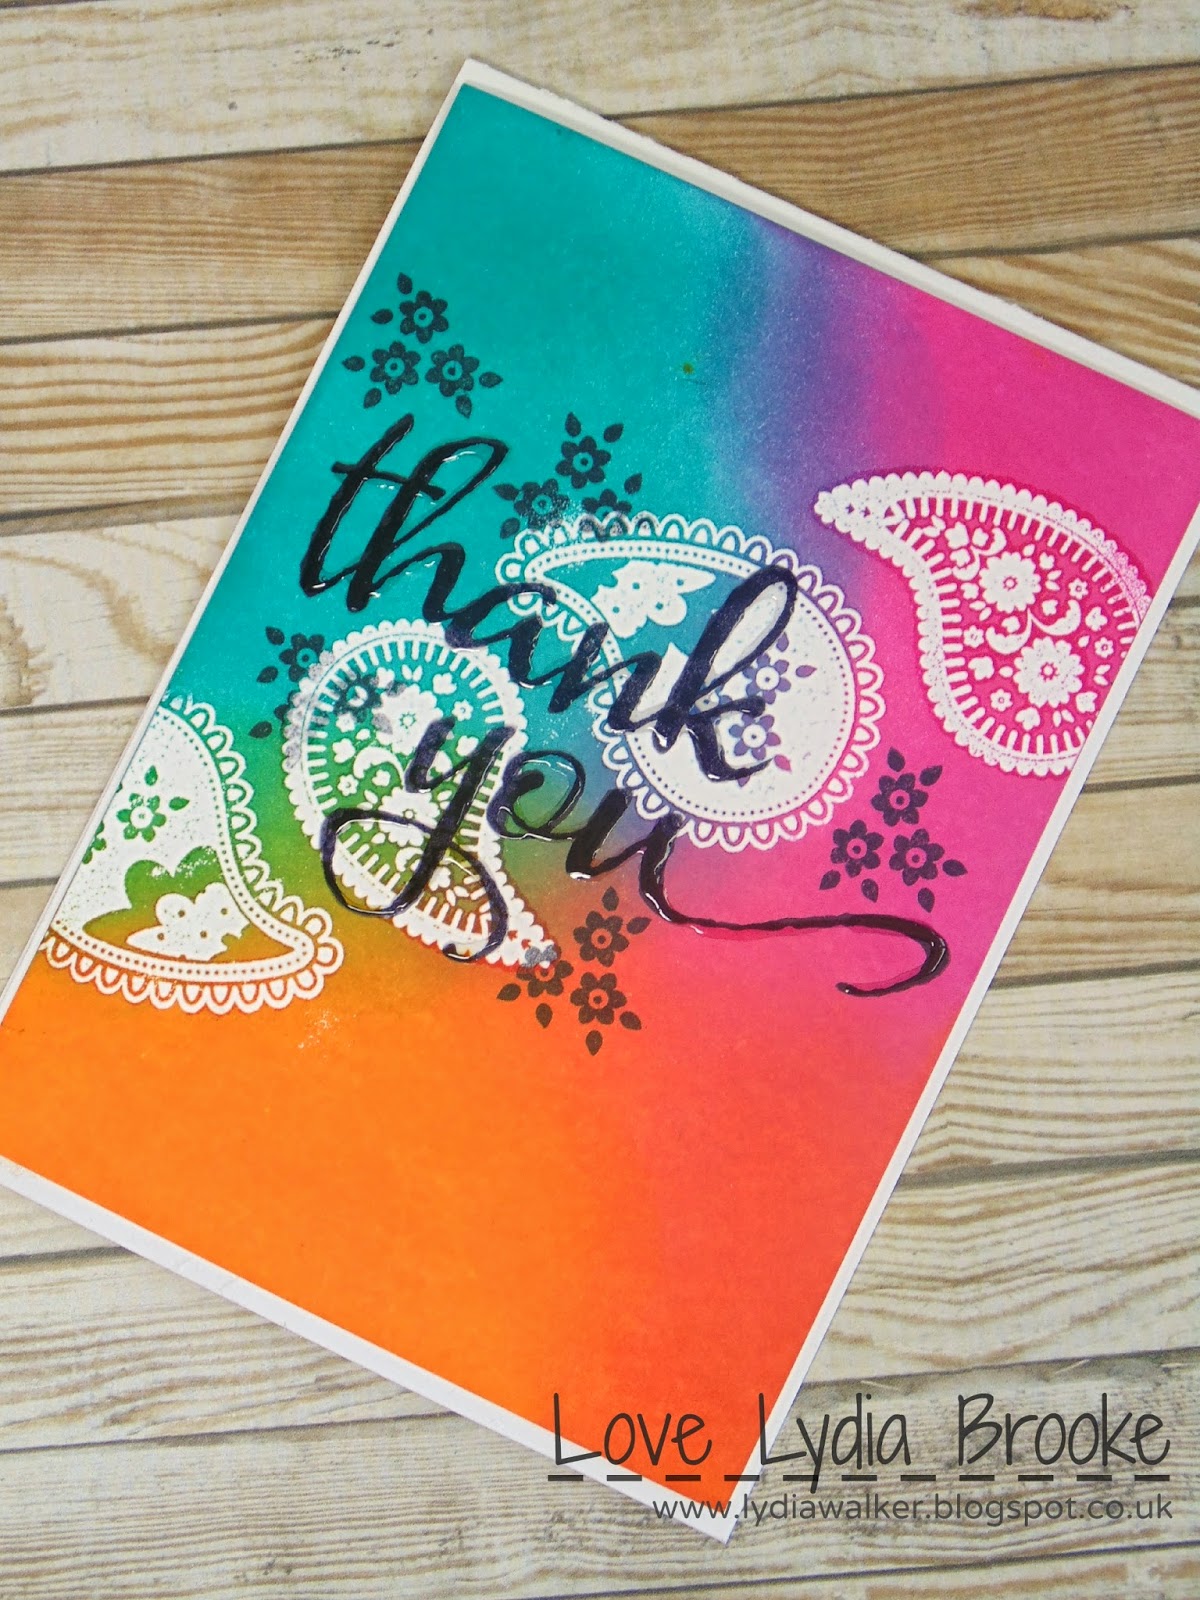
Hi there and Happy Thursday! So it's my time of the month to post here on Craft Stamper Magazine Blog, every first Thursday I'll be sharing a card taking an idea from my article that month.

This month I showed a technique using heat embossing, inking and then taking the embossing off to create a matt, flat surface to then stamp onto. In the article it was very subtle but to today the card is very vibrant so you can see it works from a lot of different styles.


*Stamp the paisleys from Wplus9 'Paisley Patterns' in Versa Mark and heat emboss using a clear powder.
*Ink the card base using Distress Ink and a blending tool (Picked Raspberry, Peacock Feathers and Spiced Marmalade).
*Using the technique shown in the July 2012 Issue 'Emboss On, Emboss Off' remove the clear embossing powder from your project.
*Stamp the sentiment from Winnie & Walter 'The Big, The Bold and You' and cover with glossy accents. 


By using this technique you can add lots of inked layers and still be able to stamp on a flat surface.


If you have created something that was inspired by my article I would totally love to see it! Leave a link to your project in the comments section (or even over on my blog). I'll pop on over and take a look.

Hugs, Lydia xxx