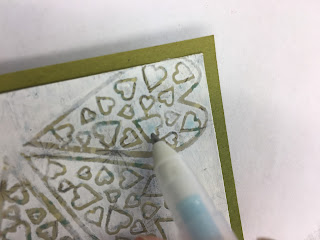
The free polymer stamp on the September issue of Craft Stamper magazine is a striking heart design. Created by the talented Marion Emberson, she shared two inspirational projects using it in the magazine. Today we are sharing two more, and you can see just how useful the ‘stick’ aspect of the stamp design can be!
Believe by Marion Emberson for WOW! Embossing Powder.
For the new home project in the September issue of Craft Stamper, the ‘stick’ part of my stamp design was used as a trunk, to turn the heart into a tree shape. With this project, the ‘stick’ becomes a hanger for the heart decorations!
One of the BEST things about WOW! Embossing Powder and Sparkles is that they are static free, not only that but the jars are too, so when you mix things up a bit ( as in this project) it pays to have the right products, if you use any other jars you will put the static back in the product... and we took ages to get it out !! Plastic spoons will also reintroduce the static, so metal spoons are best used for mixing!
Materials used :
WOW! Embossing Powder - Platinum
WOW! Embossing Powder Ultra Clear Ink Pad
WOW! Embossing Powder Heat Tool
WOW! Embossing Powder - Sparkles - A girls best friend
WOW! Embossing Powder - Empty Jars
Craft Stamper Cover Stamp
Metal Spoon
White card blank
Card Stock Red: White
Brayer
Sizzix Tim Holtz Christmas Words Die
Sweet Dixie Snowflake Die
Quickie Glue Pen
Diamontes
Instructions:
1: Using the WOW! empty jar, mix one spoonful of WOW! Platinum to one spoonful of WOW! Sparkles A Girls Best Friend, put the lid on and shake. You’ve now just made a gorgeous sparkly embossing powder.
2: Stamp and emboss the hearts on the white card stock, using the mixed powder. Then stamp and emboss the lines (or ‘sticks’!), to make the hearts ‘hang’ ,using the WOW! Platinum.
3: To create the word, use a brayer to pick up ink and brayer it onto scrap card stock.
4: Sprinkle on WOW! Platinum shake off the excess and heat, this will give you a really smooth finish.
5: Die cut the word from the Platinum embossed card.
6: Adhere the embossed heart panel to red card, and a white card blank as shown.
7: Cut white cardstock to fit the bottom of the card, (leaving room for the red strip where the word will be adhered). Die cut three snowflakes and adhere to this white card. Add a dot of glue to the centre of each snowflake with the glue pen.
8: When the glue is tacky, add foil in the centre of the snowflakes, sprinkle with the mixed powder and heat set.
Hello Flower by Marion Emberson for WOW! Embossing Powder.
Turning the heart into a flower is a must! As soon as I created this design I knew it had to be a flower somewhere along the line.
I’ve gone for a more distressed look by letting the paint dry a little more before rubbing off. This means it will have set in place, although you can still get it off with a baby wipe. (don’t rub to hard!) I’ve also been quite rough with my glue pen and not worried too much if I’ve filled it in perfectly, giving the foil a distressed look. The smaller the patterned paper the better for this project.
Materials used :
WOW! Embossing Powder - Clear Gloss Regular
WOW! Embossing Powder - Ultra Clear Ink Pad
WOW! Embossing Powder - Heat Tool
WOW! Embossing Powder - Fab Foil - Gold
Paper Artsy Fresco paint - Snowflake
Craft Stamper Cover Stamp
White card blank measuring 4.5” x 4.5”
Green Bazzill Cardstock
Patterned Paper Momenta
HELLO Die
Quickie Glue Pen
Instructions:
1: Ink the stamp with the Ultra Clear ink pad
2: Stamp the heart multiple times on the patterned paper (in a flower shape, using the hearts as petals) Clear emboss.
3: Once cool, paint Snowflake Fresco finish all over the embossed hearts.
4:Rub paint off from embossed images with kitchen roll (see info in the introduction)
5: Fill in a selection of hearts with the Quickie Glue Pen, leave to go tacky. Be aware, this technique won’t work if the glue is still blue, as this means the glue is still wet!
6: Place the Fab Foil on top of the glued areas, rub and pull off, revealing the foil.
7: Die cut Hello and a circle from green cardstock and adhere, mount card onto green card stock.
THANK YOU so much Marion, both for the fabulous stamp design, and of course for these stunning projects using it. I’m sure we’re all inspired and can’t wait to have a go!
All WOW! products can be found in all good craft shops, or online at:


these are very beautiful love the card on top.
ReplyDeletegr karin
So enjoyed reading this post and learnt lots...Thank you for the inspiration and tips along the way x
ReplyDeleteGuess who has been using plastic spoons with their EP?!! Too late for the pots in my stash but I'll be sure to switch to metal... thanks for the tips!
ReplyDeleteWOW Love the embossed diecut idea- So clever!!!
ReplyDeleteAmazing cards by Bev and her team! Definitely inspired and inspiring!
ReplyDeleteผลบอล