Challenge Rules

Take It , Make It Challenge Guidelines

Privacy Policy

Friday, 30 November 2018

Craft Stamper Take It Mke It Challenge: November Winners!

Hello everyone!
We are thrilled to announce the winners of our November challenge!

As you all know, we have two winners to annouce today, so without further ado let me introduce you to our Design Winner:

Entry number 27: Maria


We loved this gorgeous card by Maria. The bright and bold blooms certainly brighten up a dull day! We loved it! Maria will win a Guest Designer slot here on the blog, her very own Winner's Profile, and of course her amazing art will be featured in a two page spread in Craft Stamper magazine! Congratulations Maria!

We also have the remaining top slots to announce!
The rest of the top three Design Winners are:

Congratulations, it was such a hard choice this month!

We now need to share the random winner of our challenge. This winner will receive the amazing prize on offer....


Congratulations to....


I'm sure you've love the prize Jane:)


Winners, you need to need to get in touch with me in order to claim your prize!  Please email me at: editor.cs@mytimemedia.com , and put TIMI Winner in the subject line, then I'll be sure to spot it! 
Top Three Design Winners, also please contact me if you wish to receive a button to display on your blog.

Our November challenge will be launched next Friday, December 7th.
We can't wait to see all the wonderful art you will all be sharing!

Friday, 16 November 2018

Take It Make It Challenge: Winners Profile

Hello!
Welcome to our Winners Profile, showcasing the Design Winner of last month's Take It Make It challenge!
The very talented winner of the October 2018 challenge is:


Karen Dunbrook


Karen won the challenge with this beautiful card. We loved thedeep blues and purples of the background, the snowflakes sit perfectly on top! Gorgeous.


We asked Karen few questions about stamping (well, we are Craft Stamper after all!)

Q: If money were no object, what would be on your craft stash wish list? Or do you have everything you need already?
A: If money were no object, I would have a dedicated craft room where I could organize all my supplies....and 
more stamps of course!

Q: Are you a silent crafter or do you need music to work to? If so, what is your crafting playlist?
A: I usually craft with the local radio station on. They play a variety of old and new music.

Q: Thinking about colours…. Do you have a particular colour ’block’? One that you struggle to use, or just plain hate?
A: I don’t think I have a colour block but I do have to force myself to step away from using my blues.

Q: If someone were to design a stamp especially for you, what would it look like? Or does that stamp already exist? If it does, what is it?! 
A:  Scratching my head on that question. I love the look of collage cards so I would have to say a collage style 
stamp that features a wild flower garden. I don’t know it that exists or not.

Q: Are you super speedy, or more of a take your time crafter? Quick projects or week long extravaganzas? 
A: I am not speedy but I have very limited time to craft with my job being very demanding as a Daycare Provider 
so I will start creating a card and often have to come back to work on it the next day. I find when I rush, it just 
doesn’t meet my expectations.

We also asked Karen to share some of her favourite stamped creations with us, and tell us why she likes them so much. Here is what she has chosen:


"I love creating collage style card and this one was fun. I tried to use a large variety of stamps that are sitting in 
my stash and added some of my favorite Distress Oxide inks over the stamping" - Karen


"One of my favourite technique I call is ‘acetate inking’ and this card features it well. I rub some DOX onto 
a sheet of acetate, spray with water and apply it to my cardstock. Love the effect and it is so easy 
to do and control" - Karen


Congraulations on being our October Design Winner Karen, it was lovely to learn a little more about you!

Do YOU fancy having a winners profile all about you on the CS blog? 

The profile is part of the prize package for each Design Winner of our challenges. All you need to do is enter a creation into the challenge, then if you are voted Design Winner everyone will be reading all about you before you know it!

Thursday, 15 November 2018

Art Call: Ready Set Stamp

Ready Set Stamp: Reader Submissions Wanted!

THANK YOU so much for all the fabulous cards submitted for our last art call, it was so hard to choose just a few to publish! We can now announce the next theme.....
We are looking for submissions for our Ready, Set, Stamp feature on the following theme for our March 2019 issue of Craft Stamper. If you've always wanted to see YOUR card in print, now is your chance!

For 2019 we're changing things up slightly, giving you FIVE colour options to play with! Don't forget, black, white and any metallics are always welcome no matter the colour scheme. 


Colours: Pale Rose, Thistle, Pale Violet, Periwinkle, Pale Azure

Deadline for submission: 17th December 2018


· Please email your submissions to: editor.cs@mytimemedia.com
· Please put 'Ready Set Stamp' followed by the theme in the subject line
· Please note that due to the number of submissions it's not possible to contact every entrant individually - if you have not heard from us within one week, your submission has not been successful. Please try again with a different card!


Guidelines:

  •  Please make cards only for this gallery.
  • Please follow both the theme AND the colour scheme when creating your cards!
  • NEW work only please, we do not accept cards that have been published elsewhere (including online) before submission.  
  • Any stamps used MUST be branded. Please do not use stamps sold without designer/manufacturer information on the original packaging.
  •  Stamps used MUST be available to buy currently, either from a UK stockist or a stockist with an international shipping policy that ships to the UK.
  • We do not accept cards ONLY created with digital imagery for this feature. Digital imagery is welcome, but  MUST be used in conjunction with rubber/polymer stamping to qualify.
  •  Cards which are selected need to be posted to the Craft Stamper offices in the UK. The cards will be returned, along with a complimentary issue of the magazine.
  • This call IS open internationally.
  • Note that we do choose artwork as it arrives, so please don't wait until the last minute to submit if your cards are ready.
  •  Black, white and metallics can be added to any of the schemes. The ideas given are simply that, ideas, and do not have to be followed to the letter!
  • Text for this article is required (don't worry - it is short!) and should be entered into the document provided – this will be sent to you if you are selected.
  •  
We can't wait to see your fabulous creations!  

Friday, 9 November 2018

Take It Make It November Challenge: Inspiration

Hello!
Our November challenge is well under way, we love all the entries we've seen so far, and can't wait to see more!
As it's the second Friday of the month, we're back with some more amazing eye candy from our DT, hopefully something will inspire you to enter the challenge!

So... just a little reminder before we show you the projects!

 ALL of our challenges this year are 'Anything Goes' stamping challenges!
So....Show us how unique you can be, create anything your imagination cares to dream up! Share your cards, journal pages, layouts, 3D assemblage or whatever else takes your fancy. As long as you have stamped somewhere on your project, then you're good to go!

We have two prizes on offer, as always. The first is the Sponsor Prize, and the winner of this will be randomly chosen from all the eligible entries of the challenge. To make sure your project is eligible to win, make sure you have followed our challenge guidelines. These can be found on our sidebar over here ---------->

and also in a tab under the banner at the top.


PLEASE REMEMBER: We only want to see ONE project in each individual blog post entry!


A set counts as more than one :)

The amazing prize on offer this month for the randomly chosen winner is..... (drum roll please..........) 


Our Design team have created some more stunning stamped art for you to look at, we hope it inspires you to enter the challenge!

Guest Designer, Winner of the September challenge:

Jane Tyrrell


Cheremane Smith


Wow!
Amazing inspiration from the DT!
The link up tool to enter the challenge can be found on last Fridays post HERE!

Thursday, 8 November 2018

October Blog Challenge Random Winner Re-draw

Morning everyone,
The winner of the Eileen Hull die did not come forward after out October challenge winners were announced, so as the t&cs stipulate, the prize will now be re-drawn.
The prize:


 The new winner....


Congrats Elly! Please can you contact me at: editor.cs@mytimemedia.com, and I can arrange for the die to be sent to you!


Saturday, 3 November 2018

Blog Exclusive: Brenda Brown

Good Morning!
In the December issue of Craft Stamper, Brenda Brown shared stunning projects with the readers, gorgeous examples of a faux encaustic technique!


The step by step tutorial in the magazine showed us how to create the faux encaustic layers on the tag, but as you can see, that isn't the whole project! Brenda has very kindly shared a step by step tutorial for the background art board, and also the easel that enables the whole thing to stand up! Over to Brenda..............


If you have seen my mixed media Easel Art Board in this month’s issue of the Craft Stamper I thought you 
might like to see how I made the background for the tag, and the easel to make it stand. I love using easels on 
my small pieces of art work so they can stand on a shelf and be moved around easily.

Easel Board Background 

Remember the edges are the most important part of this, as the middle will be covered by the tag. I used a 
7” x 5” canvas board from The Works, but you should be able to pick them up in some art shops as well. 
Definitely look online for some good deals.

STEP ONE: Add some acrylic colours using a water spritzer and a wet wipe. Start with the sap green at the 
bottom, the cerulean blue at the top and blend them together in the middle using the 2 lightest colours. Keep 
them watery and translucent.


STEP TWO: Use a brayer and layer over some white gesso just hitting the top of the canvas.


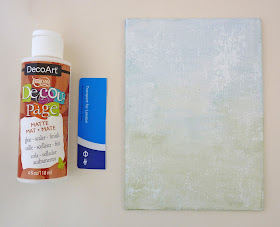
STEP THREE: Scrape decoupage randomly over with plastic card, not too thickly and put one side to dry.


STEP FOUR: Take a babywipe and blend the green and blue colours over again and slightly darker, keep 
wiping back and adding more until you are happy with the darker contrast over the light. You will see the 
contrast of the areas with the decoupage resist too.


STEP FIVE: When dry splatter with some vintage mixed red (cadmium red hue, titanium white and burnt 
umber) and almost immediately lightly lay a dry piece of kitchen roll over the top to take out some of the colour.


STEP SIX: Stamp second generation text with watering can archival ink and splatter with white paint.


STEP SEVEN: Distress the edges with sand paper and blend with Ground Espresso distress ink. If you want to 
seal it use a mat spray otherwise the distress ink will move around with a sealer or varnish using a paint brush.


Make your own Easel Back.  
(These dimensions specifically fit the 7x5 inch canvas board)

Here’s the simple easel I made for the back of my Easel Art project this month.
Rymans do packs of A4 card at 480 gms for just a few pounds which is perfect for this project.

STEP ONE: - Cut a piece of strong card 21 x 8 cms.
Score and fold at 13 cms.
Punch a hole through the two layers in the middle of the smaller piece. I used a Japanese Hole Punch.


STEP TWO: - Cut a piece of ribbon about 10 cms long and 
thread it through the holes from front to back and glue it down on the front and back pieces leaving about 2 cms 
in the middle. When that’s dry cover both pieces of glued down ribbon with some masking tape to help secure 
it further.


STEP THREE: - Cut another piece of card 8 x 13 cms and adhere it to the front of the easel (the long side) 
leaving it under something heavy for a little while for the glue to dry thoroughly and promote a strong bond. 
This gives a very sturdy easel to support the board.


STEP FOUR: - If you have a particular colour or pattern back to the canvas board you can add a piece of 
patterned paper (again 8 x 13 cms) to the previous piece.


STEP FIVE: - Now adhere the smaller side to the back of the canvas board so that the easel will lay flat. 
Again leave it under something heavy to dry. It is easier to do this before adding all your embellishments on the 
front of the board.


Thank you so much Brenda!


We have a special giveaway to share on our Facebook page on Monday 5th November, a nice big bundle of 
the paints and modeling paste Brenda used in her article! Don't forget to check it out!