Welcome back Georgina! Hopefully everyone saw the amazing project yesterday, sit back and enjoy another stunning tutorial!
Following on from my 3D Challenge project in the November edition of
Craft Stamper magazine and my blog post earlier this month, I'm back with some more creative ideas again using the lovely Wild Flowers stamp set from
Craftwork Cards. This time I have used the stamps with the fab
Gelli® Plate! For this post I used a 3x5" Gelli® Plate. I love to use the Gelli® Plate with Distress Ink pads to create background. So please read on to see my three background techniques and now I have build on top of them to create a finish piece.
A close-up of my first piece...
To create this I started by stamping Salty Ocean, Stormy Sky, Peeled Paint and Forest Moss Distress Ink pads directly onto the Gelli® Plate. Then using three different brown Distress Ink I stamped the flowers and grasses also directly onto the Gelli® Plate.
A close-up of the flowers and grasses stamped onto the Gelli®.
I then took a print.
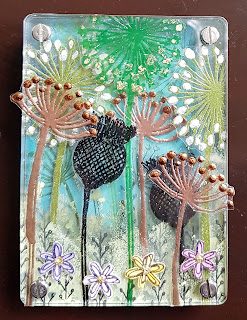
Once the print was dry, I stamped and heat embossed a selection of flowers and grasses. I stamped the flowers with a VersaMark ink pad and them used
WOW! Embossing Powders. I used Earthstone Olive, Primary Evergreen, Metallic Copper and Primary Ebony.
I them stamped and heat embossed, using Indigo, Sunny Yellow and Earthstone Pomegranate
WOW! Embossing Powders, some little flowers to place into between the long stems of the flowers and grasses. Lastly I added dots of
Imagination Crafts Starlights paint in White Gold, Topaz and Pearl to the flower and grass heads using an end of a paint brush.
My first finished piece. This would make a lovely gift for someone if mounted into a frame.
For my second piece I again stamped the same blue and green Distress Ink pads directly onto the Gelli® Plate. I them stamped the Wild Flower stamps onto the Gelli® Plate but with no ink on them. I made sure I cleaned the stamps after each stamp to make sure that any ink that the stamp removed was cleared away and not then put back onto the Gelli® Plate next time I stamped the same stamp.
I then took a print. Can you see the outlines of the flowers and grasses where the stamp has removed the ink from the Gelli Plate?
I then masked-off the border with Post-It notes. I stamped the flower and grasses with Jet Black Archival ink pad. I wanted to make sure some of the stamped images went over the edge.
Lastly I stamped a sentiment. These words stamps are also from the Craftwork Cards Wild Flower stamp set. This would make a lovely card topper or a page in the journal with either stamping or writing in your own words.
For my third and final project, I started again by stamping the blue and green Distress Ink pads onto the Gelli® Plate. But this time I spritzed the Plate with water before taking a print. I love the little coloured droplet of water that form...
I took a print and once dry I begun to stamp the flowers and grasses. I used a selection of Distress Ink pads as show below.
I stamped the tallest flower/grasses first. I wanted to stamp over the edge of the Gelli® Plate print onto the white border as I really like the effect of the stamped images bursting out of the background.
I then worked my way down to the shorter grasses and lastly the little flowers. I also used second-generation stamping to get a lighter colour so some grasses appeared to be further away.
I hope these three stamping and Gelli® Plate project have inspired you to create your own meadows.
Thanks so much Georgina!


