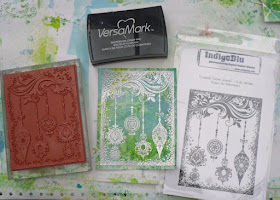
Our project this week is by the super talented Helen Chilton, and was first published in the December 2014 issue of Craft Stamper. Helen shows us how to create a masterboard, and use it to create this stunning card!
Helen says:
I'd never made a masterboard before but I'm always up for an experiment. It's a really good way of creating something unique and is surprisingly easy once you get started.
A masterboard is simply a large background piece that is then cut
up into smaller pieces and used for several projects. It's like your own
personalised piece of patterned paper. The beauty of it is that anything goes.
You can use paints, inks, sprays, pencils, stamps, doodling, stencils… whatever
you like. It's your choice and it's very liberating.
I started with some blobs of
paint and a roller and just brayered it this way and that. Next I sprayed inks,
and then used inkpads for stencilling in different colours before getting to
the stamping layers. Try to stamp randomly using background stamps, images,
borders etc. While you’re doing all this, don't underestimate the white spaces.
When you spray or stencil or stamp it looks different on the paint than on the
white paper, creating more interest.
MATERIALS
Stamps Helen used...
IndigoBlu: Connor's Crown Jewels IND0121; Snowflake Lace IND0113; Dinkie Holly Flourish IND0122
IndigoBlu: Connor's Crown Jewels IND0121; Snowflake Lace IND0113; Dinkie Holly Flourish IND0122
Other materials...
PaperArtsy Fresco Finish
Acrylic paint: Ice Blue; Mermaid; Antarctic;
Distress Inks: Stormy Sky;
Mowed Lawn; Evergreen Bough
Crafters Workshop Stencils:
Quatrefoil TCW381; Ledger TCW267
Memory Box Designer Stencil:
Texture Rhapsody 88515
VersaMark Ink
Dylusions Spray Inks: Fresh
Lime; Vibrant Turquoise
Silver embossing powder
Pebeo Mirror Effect Foil
Leaves: Silver
A3 heavyweight cartridge
paper
Glue stick/glue pen
Mirror card: silver
Card: green; light blue
Brayer
Heat
gunStep by step instructions:
1 Blob some paint on the cartridge paper, using all three colours.
2 Brayer the blobs of paint over the paper, working in all directions. Leave plenty of gaps.
3 Spray on the Dylusions inks, rolling them out with the brayer as you go.
4 Choose your stencils and which ink pads you're going to use. I've chosen a large background pattern, a text stamp and a small repetitive pattern.
5 After using the Texture Rhapsody stencil and Evergreen Bough ink pad, it looks like this. The stencilling appears different depending on what's behind it.
6 Next stamp over the design randomly in two different colours. I've used a large snowflake background and a small flourish.
7 This close-up shows how the masterboard comes together. I stopped here but you can carry on building up the layers as you want.
8 Cut out some windows the size of your card backgrounds, and place these over the masterboard to see which areas you like best.
9 Use the windows as templates and cut out five pieces from the masterboard. Keep any leftovers for stamping onto.
10 Stamp and silver emboss the bauble collage.
11 Very lightly rub over the embossed areas with a glue stick. For more detailed areas use a glue pen and allow to dry slightly.
12 Press the foil over the glued areas silver side up and then pull off.
To finish:
Stamp
and emboss extra parts of the image to layer on top, and add embellishments.
Layer onto silver mirror, green and light blue card.Wow! We love this... so much amazing detail!
Thank you so much Helen!
Don't forget to check back next Thursday for another blast from the past Christmas project!


Gorgeous festive project Helen!
ReplyDelete